
About the pack
Horizons Unbound is a Forge 1.20.1 sandbox pack that brings big tech, deep exploration and a cozy, living world together in one game.
There are no quests and no gated progression. Every system is available from day one, and you pick the path that interests you. Most players mix several of them.
Über das Pack
Horizons Unbound ist ein Sandbox-Pack für Forge 1.20.1, das große Technik, tiefe Erkundung und eine gemütliche, lebendige Welt in einem Spiel vereint.
Es gibt keine Quests und keinen vorgegebenen Fortschritt. Alle Systeme stehen dir vom ersten Tag an offen, und du wählst den Weg, der dich interessiert. Die meisten Spieler kombinieren mehrere.
Installation
- Install the CurseForge app and open the Minecraft section.
- Search for Horizons Unbound and click Install. CurseForge downloads Forge, all mods and the configs automatically.
- Open the pack's Profile Options and set the allocated memory to 8 GB.
- Click Play. The first launch takes a few minutes while everything is loaded and cached.
| Requirement | Value |
|---|---|
| Minecraft | 1.20.1 |
| Mod loader | Forge 47.4.10 |
| RAM | 8 GB recommended, 6 GB minimum. More than 10 GB does not help and can cause stutters. |
| Java | 17 (included with the CurseForge app) |
Other launchers: Prism Launcher, ATLauncher and similar launchers can import the pack too. Five mod authors only allow downloads through CurseForge, so your launcher will ask you to download those mods by hand.
Installation
- Installiere die CurseForge-App und öffne den Bereich Minecraft.
- Suche nach Horizons Unbound und klicke auf Install. CurseForge lädt Forge, alle Mods und die Configs automatisch herunter.
- Öffne die Profile Options des Packs und stelle den Arbeitsspeicher auf 8 GB.
- Klicke auf Play. Der erste Start dauert ein paar Minuten, weil alles geladen und zwischengespeichert wird.
| Anforderung | Wert |
|---|---|
| Minecraft | 1.20.1 |
| Mod-Loader | Forge 47.4.10 |
| RAM | 8 GB empfohlen, mindestens 6 GB. Mehr als 10 GB bringt nichts und kann Ruckler verursachen. |
| Java | 17 (in der CurseForge-App enthalten) |
Andere Launcher: Prism Launcher, ATLauncher und ähnliche Launcher können das Pack ebenfalls importieren. Fünf Mod-Autoren erlauben Downloads nur über CurseForge. Dein Launcher bittet dich deshalb, diese Mods von Hand herunterzuladen.
Latest updateNeuestes Update
This is the newest version on CurseForge. As soon as an update is out, the CurseForge app shows an update button on your pack. Servers have to run the same version as the players.
Das ist die neueste Version auf CurseForge. Sobald ein Update erschienen ist, zeigt die CurseForge-App an deinem Pack einen Update-Knopf. Server müssen dieselbe Version wie die Spieler verwenden.
Horizons Unbound
Open on CurseForge ↗Auf CurseForge öffnen ↗ Server pack ↗Server-Pack ↗
Your journey
Eight chapters that take you from your first night to the Moon. Each one shows real screenshots and animations from the pack, the exact recipes you need and a short checklist. Your ticks are saved in this browser.
You don't have to follow the order. Chapters 2 to 5 are the tech path, 7 and 8 work at any time. If you get stuck, every chapter links videos from creators who explain the mod in depth.
Dein Weg
Acht Kapitel, die dich von deiner ersten Nacht bis zum Mond führen. Jedes zeigt echte Screenshots und Animationen aus dem Pack, genau die Rezepte, die du brauchst, und eine kurze Checkliste. Deine Haken werden in diesem Browser gespeichert.
Du musst dich nicht an die Reihenfolge halten. Die Kapitel 2 bis 5 sind der Technik-Weg, 7 und 8 gehen jederzeit. Wenn du nicht weiterkommst, verlinkt jedes Kapitel Videos von Creatorn, die die Mod ausführlich erklären.
Survive the first dayDen ersten Tag überleben
Shelter, food, a backpack and a way home.Unterschlupf, Essen, ein Rucksack und ein Weg nach Hause.
The first night works like in vanilla Minecraft, but the world is bigger and wilder. Terralith and Biomes O' Plenty change how the land looks, so take a moment to look around before you settle.
- Gather wood, stone and food. Cows, pigs and chickens are still around, and berry bushes and crops from Farmer's Delight and Croptopia grow wild.
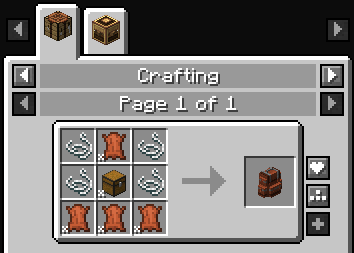
- Craft a backpack. Leather, string and a chest make a Sophisticated Backpack. Wear it on your back and press B to open it anywhere.
- Find a village. Villages are rebuilt by ChoiceTheorem's Overhauled Village and often have a Waystone in the middle. Right-click it once to activate it. From then on you can teleport back to it from any other waystone.
- Open the map with J. JourneyMap maps everything you see. Create a waypoint at your base so you always find home.
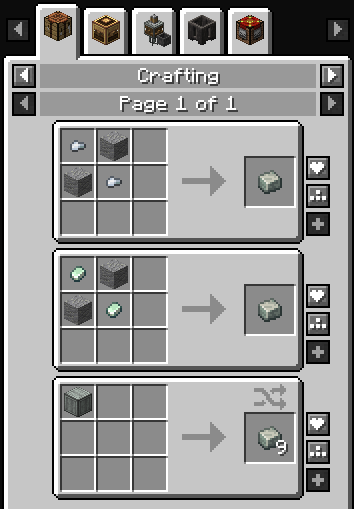
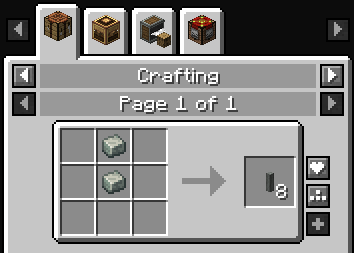
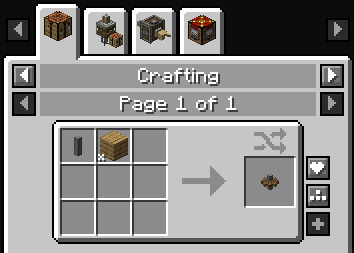
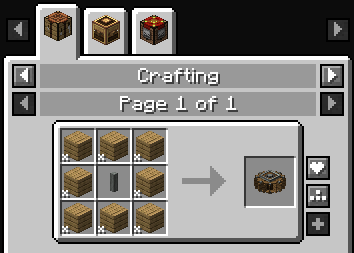
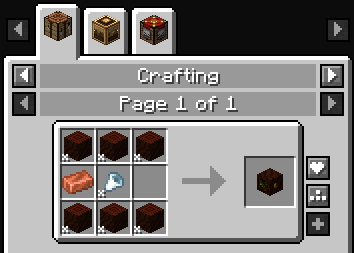
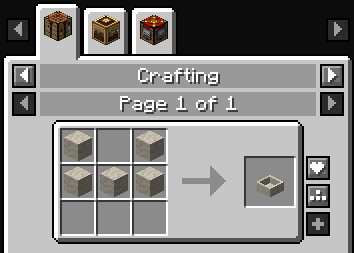
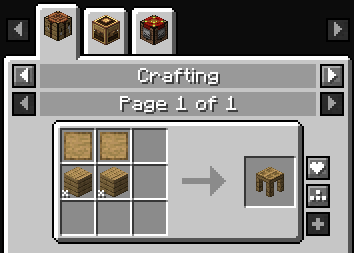
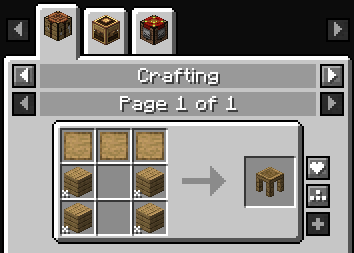
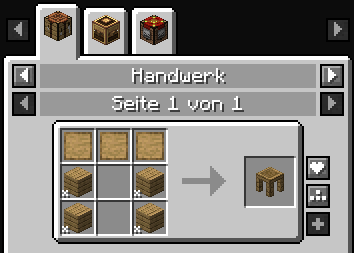
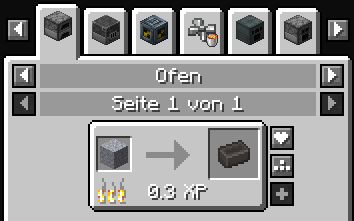
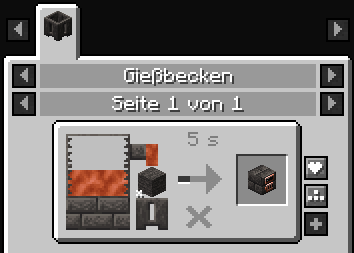
- Look up any recipe. Hover over an item in your inventory and press R for its recipe or U for what it is used in. Every recipe picture on this page is a real EMI screen from the pack.
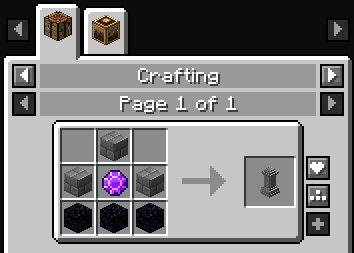
If you die, your items stay in a corpse where you fell, and JourneyMap marks the spot. Walk back and right-click the corpse to get everything back.
Seasons are on. Serene Seasons changes the season every few in-game weeks, and most crops only grow in some of them. Hover over seeds to check before you plant a big farm.
Checklist
Watch
Die erste Nacht läuft wie in Vanilla-Minecraft ab, nur ist die Welt größer und wilder. Terralith und Biomes O' Plenty verändern die Landschaft, also schau dich kurz um, bevor du dich niederlässt.
- Sammle Holz, Stein und Essen. Kühe, Schweine und Hühner gibt es weiterhin, und Beerensträucher und Pflanzen aus Farmer's Delight und Croptopia wachsen wild.
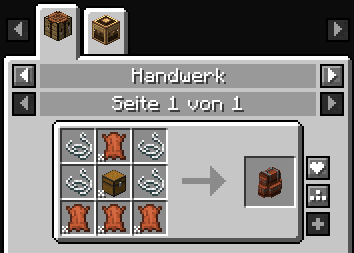
- Baue einen Rucksack. Aus Leder, Faden und einer Truhe wird ein Sophisticated Backpack. Trage ihn auf dem Rücken und öffne ihn überall mit B.
- Finde ein Dorf. Dörfer sind von ChoiceTheorem's Overhauled Village neu gebaut und haben oft einen Wegstein in der Mitte. Klicke ihn einmal mit Rechtsklick an, um ihn zu aktivieren. Danach kannst du dich von jedem anderen Wegstein dorthin teleportieren.
- Öffne die Karte mit J. JourneyMap zeichnet alles auf, was du siehst. Setze einen Wegpunkt bei deiner Basis, damit du immer nach Hause findest.
- Schlag jedes Rezept nach. Fahre im Inventar mit der Maus über ein Item und drücke R für das Rezept oder U für die Verwendungen. Jedes Rezeptbild auf dieser Seite ist ein echter EMI-Bildschirm aus dem Pack.
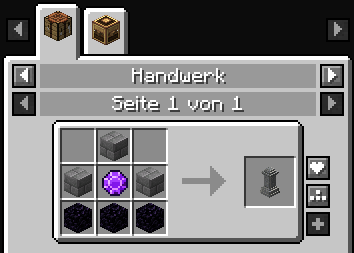
Wenn du stirbst, bleiben deine Items in einer Leiche an der Stelle liegen, und JourneyMap markiert den Ort. Geh zurück und klicke die Leiche mit Rechtsklick an, um alles zurückzubekommen.
Es gibt Jahreszeiten. Serene Seasons wechselt die Jahreszeit alle paar Spielwochen, und die meisten Pflanzen wachsen nur in manchen davon. Prüfe das an den Samen, bevor du eine große Farm anlegst.
Checkliste
Videos
Your first machines with CreateDeine ersten Maschinen mit Create


A water wheel that powers a press and turns iron into sheets.Ein Wasserrad, das eine Presse antreibt und Eisen zu Blechen macht.
Create machines run on rotation instead of electricity. A generator such as a water wheel turns a shaft, and every machine on that shaft uses some of its strength, called stress. Hold Alt + W over any Create item in a menu to watch an animated tutorial like the ones below.
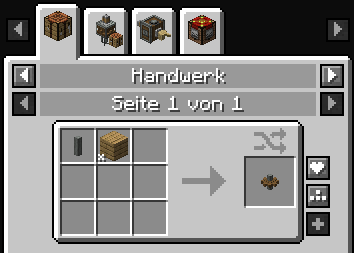
Step 1: Andesite Alloy
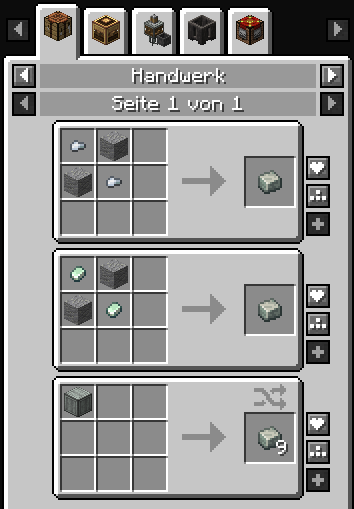
Almost every early Create part needs Andesite Alloy. Craft it from two andesite and two iron nuggets (zinc nuggets work too).
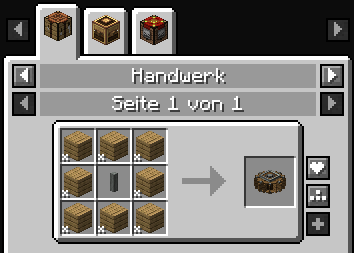


Step 2: Power from water

Place a water wheel next to flowing water. Still water and water sources do not turn it. A small stream or a waterfall works well. Carry the rotation with shafts, and change direction with cogwheels.
Step 3: The mechanical press
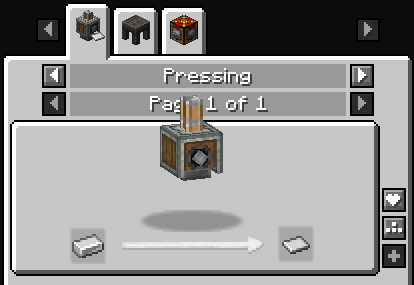
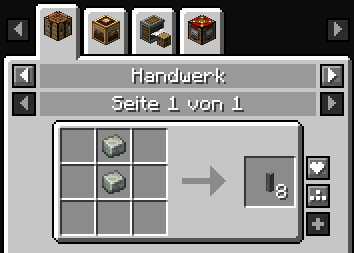
Put a mechanical press two blocks above a depot and connect it to your shaft. Drop iron ingots on the depot and the press turns them into iron sheets, which many recipes need.
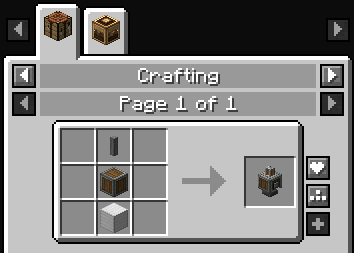
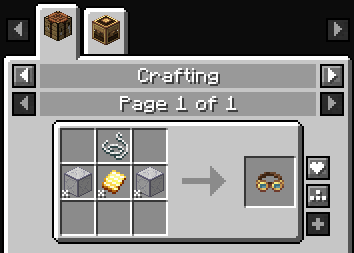
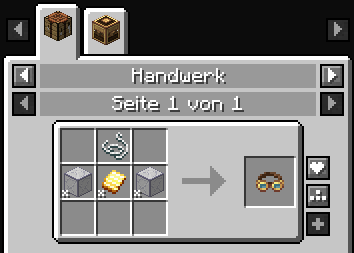
Machine stopped? Craft Engineer's Goggles and look at your shafts. They show how much stress your generators provide and how much your machines use. Add another water wheel if you are over the limit.
Checklist
Watch
Create-Maschinen laufen mit Rotation statt mit Strom. Ein Generator wie ein Wasserrad dreht eine Welle, und jede Maschine daran verbraucht einen Teil der Kraft, die Belastung (Stress). Halte in einem Menü Alt + W über einem Create-Item, um eine animierte Anleitung wie die unten zu sehen.
Schritt 1: Andesitlegierung
Fast jedes frühe Create-Teil braucht Andesitlegierung. Du stellst sie aus zwei Andesit und zwei Eisennuggets her (Zinknuggets gehen auch).
Schritt 2: Energie aus Wasser
Setze ein Wasserrad neben fließendes Wasser. Stehendes Wasser und Quellblöcke drehen es nicht. Ein kleiner Bach oder ein Wasserfall eignen sich gut. Leite die Drehung mit Wellen weiter und ändere die Richtung mit Zahnrädern.
Schritt 3: Die mechanische Presse
Setze eine mechanische Presse zwei Blöcke über ein Depot und verbinde sie mit deiner Welle. Lege Eisenbarren auf das Depot, und die Presse macht daraus Eisenbleche, die viele Rezepte brauchen.
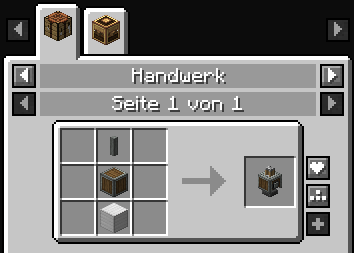
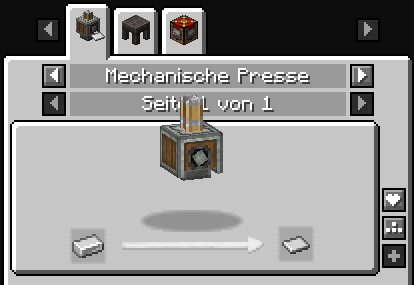

Maschine steht still? Baue eine Ingenieursbrille und schau dir deine Wellen an. Sie zeigt, wie viel Belastung deine Generatoren liefern und wie viel deine Maschinen verbrauchen. Bist du über dem Limit, bau ein weiteres Wasserrad dazu.
Checkliste
Videos
Automation and brassAutomatisierung und Messing
Belts, bulk processing and your first brass.Förderbänder, Massenverarbeitung und dein erstes Messing.


Once the press runs, connect machines with belts so items move on their own. This chapter shows the four machines that carry most early Create factories.




Brass

- Find zinc ore. It generates underground between Y −63 and Y 70.


- Catch a blaze in an Empty Blaze Burner by right-clicking it in the Nether. Place the burner under a basin and feed it coal or wood.
- Put a mechanical mixer above the basin and add copper and zinc. The heated mix becomes brass.
Brass unlocks precision mechanisms, mechanical arms, trains and the package logistics of Create 6. From here on the Ponder library is your best manual.
Checklist
Watch
Sobald die Presse läuft, verbindest du Maschinen mit Förderbändern, damit Items von selbst weiterwandern. Dieses Kapitel zeigt die vier Maschinen, die die meisten frühen Create-Fabriken tragen.
Messing
- Finde Zinkerz. Es kommt unter der Erde zwischen Y −63 und Y 70 vor.
- Fang eine Lohe mit einem leeren Lohenbrenner ein, indem du sie im Nether mit Rechtsklick anklickst. Stell den Brenner unter ein Becken und füttere ihn mit Kohle oder Holz.
- Setze einen mechanischen Mixer über das Becken und gib Kupfer und Zink hinein. Die beheizte Mischung wird zu Messing.
Messing schaltet Präzisionsgetriebe, mechanische Arme, Züge und die Paket-Logistik von Create 6 frei. Ab hier ist die Ponder-Bibliothek dein bestes Handbuch.
Checkliste
Videos
Steel and double ore with MekanismStahl und doppeltes Erz mit Mekanism
Power, steel and twice the ingots from every ore.Strom, Stahl und doppelt so viele Barren aus jedem Erz.
- Mine osmium ore and smelt it. Osmium is Mekanism's base metal and goes into almost every machine.
- Make power. A Heat Generator burns coal, wood or lava. Connect it to machines with universal cables.
- Make steel. In the Metallurgic Infuser, iron and carbon (coal or charcoal) become enriched iron. Infuse that with carbon again to get steel dust and smelt it into steel ingots.
- Double your ores. The Enrichment Chamber turns one ore into two dusts. Smelt them for twice the ingots.
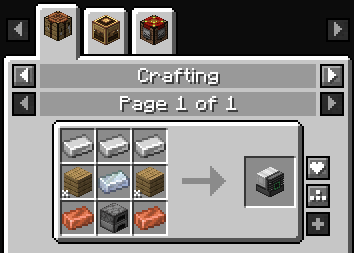
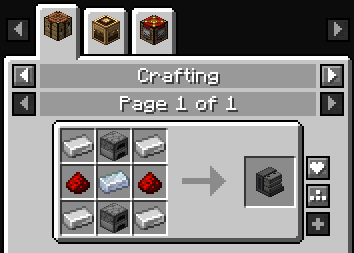
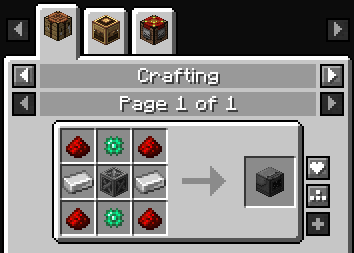
Later tiers multiply even more. Each one builds on the machines before it:
| Output | Machines |
|---|---|
| 2× ingots | Enrichment Chamber |
| 3× ingots | Purification Chamber with oxygen |
| 4× ingots | Chemical Injection Chamber with hydrogen chloride |
| 5× ingots | Chemical Dissolution Chamber, Chemical Washer and Chemical Crystallizer |
Use the Configurator to choose which side of a machine takes items, gases and energy. Press N while holding it to switch its mode.
Checklist
Watch
- Baue Osmiumerz ab und schmelze es. Osmium ist das Grundmetall von Mekanism und steckt in fast jeder Maschine.
- Erzeuge Strom. Ein Wärmegenerator verbrennt Kohle, Holz oder Lava. Verbinde ihn mit Universalkabeln mit deinen Maschinen.
- Stelle Stahl her. In der Metallurgischen Infusionsanlage werden Eisen und Kohlenstoff (Kohle oder Holzkohle) zu angereichertem Eisen. Infundierst du das noch einmal mit Kohlenstoff, entsteht Stahlstaub, den du zu Stahlbarren schmilzt.
- Verdopple deine Erze. Die Anreicherungskammer macht aus einem Erz zwei Staub. Schmilz sie für doppelt so viele Barren.
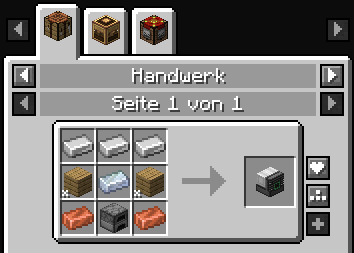
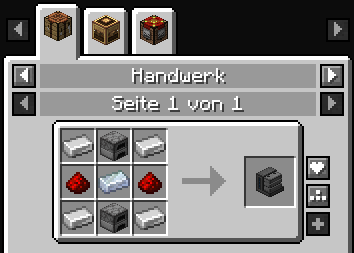
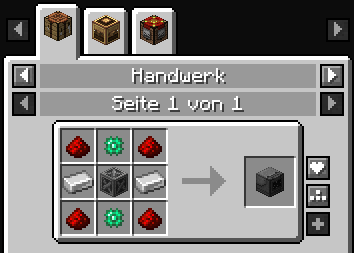
Spätere Stufen vervielfachen noch mehr. Jede baut auf den Maschinen davor auf:
| Ertrag | Maschinen |
|---|---|
| 2× Barren | Anreicherungskammer |
| 3× Barren | Klärkammer mit Sauerstoff |
| 4× Barren | Chemische Injektionskammer mit Chlorwasserstoff |
| 5× Barren | Chemische Auflösungskammer, Chemische Waschanlage und Chemischer Kristallisator |
Mit dem Konfigurator legst du fest, welche Seite einer Maschine Items, Gase und Energie annimmt. Drücke N, während du ihn hältst, um den Modus zu wechseln.
Checkliste
Videos
Digital storage with AE2Digitales Lager mit AE2
All your items in one network that you can search.Alle deine Items in einem durchsuchbaren Netzwerk.
- Find a meteorite. Its crater is easy to spot from the air or on your map. Dig into the sphere and mine the Mysterious Cube: it gives you all four inscriber presses.
- Take budding certus quartz home. Certus crystals grow on it. Growth accelerators next to it speed this up.
- Build an inscriber and a charger. With the presses you make logic, calculation and engineering processors.
- Build your first network: an ME Drive with a storage cell, a terminal and cables, powered through an energy acceptor or controller.
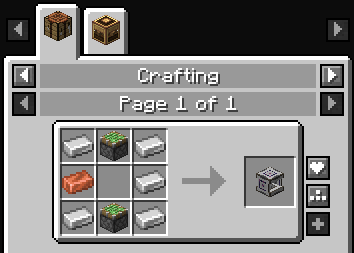
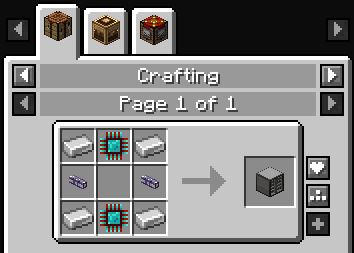
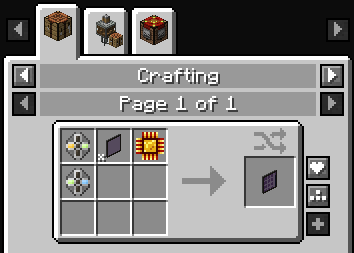
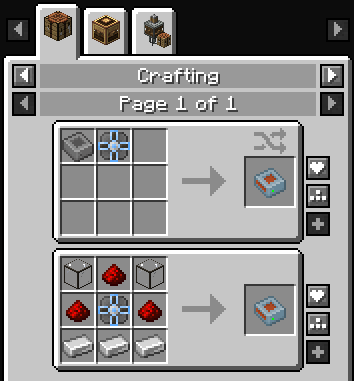
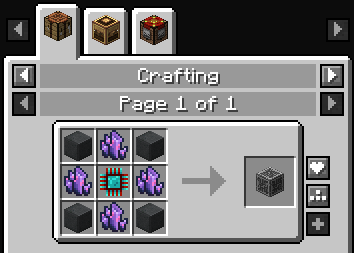
A network runs 8 devices without a controller. From the 9th device on you need an ME Controller. Hold G over any AE2 item in a menu to open its page in the built-in guide.
Checklist
Watch
- Finde einen Meteoriten. Seinen Krater erkennst du gut von oben oder auf der Karte. Grab dich in die Kugel und bau den Mysteriösen Würfel ab: Er enthält alle vier Gravurpressen.
- Nimm knospenden Certus-Quarz mit. Darauf wachsen Certus-Kristalle. Wachstumsbeschleuniger daneben machen das schneller.
- Baue eine Gravurmaschine und ein Ladegerät. Mit den Pressen stellst du Logik-, Rechen- und Konstruktionsprozessoren her.
- Baue dein erstes Netzwerk: ein ME-Laufwerk mit Speicherzelle, eine Konsole und Kabel, versorgt über einen Energieakzeptor oder Controller.
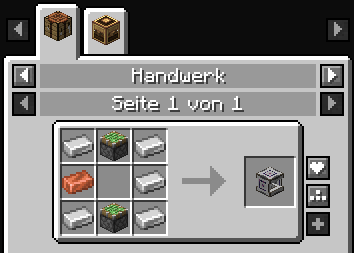
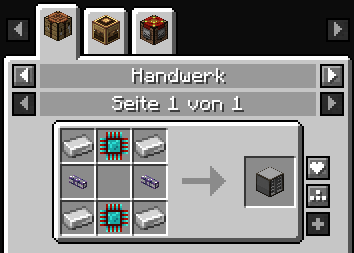
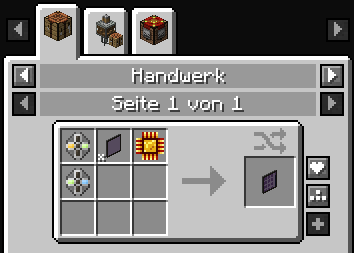
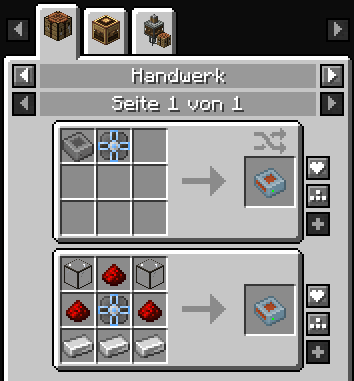
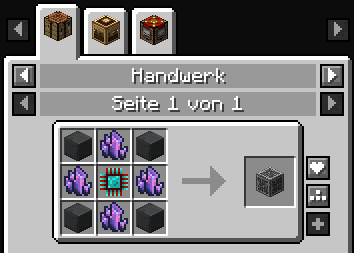
Ein Netzwerk betreibt 8 Geräte ohne Controller. Ab dem 9. Gerät brauchst du einen ME-Controller. Halte in einem Menü G über einem AE2-Item, um seine Seite im eingebauten Guide zu öffnen.
Checkliste
Videos
To the Moon with Ad AstraMit Ad Astra zum Mond
Steel, a rocket, fuel and oxygen. Then lift-off.Stahl, eine Rakete, Treibstoff und Sauerstoff. Dann der Start.
This chapter follows Ad Astra's own guide book, the Astrodux. Ad Astra uses its own steel line, but steel from Mekanism, Immersive Engineering or Tinkers also counts for rocket recipes. Only steel plates must come from Ad Astra's compressor or Immersive Engineering.
Step 1: Energy, steel and plates
- Build a coal generator. It burns coal or wood and powers every Ad Astra machine.
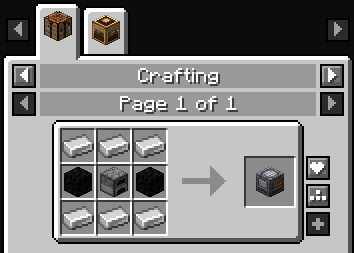
- Build an Etrionic Blast Furnace and switch it to alloying. One iron ingot and one coal make one steel ingot.
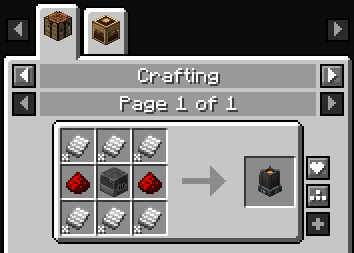
- Build a compressor. It presses steel ingots into steel plates.
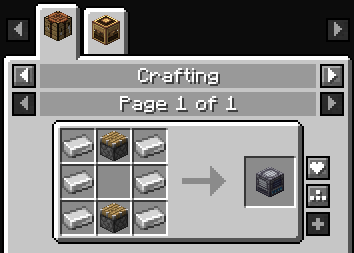
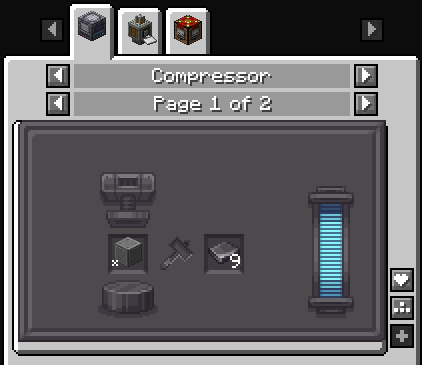
Step 2: Build the rocket
Craft the parts: a nose cone, four fins, two steel tanks and a steel engine. Put them together with six steel blocks in the NASA Workbench.
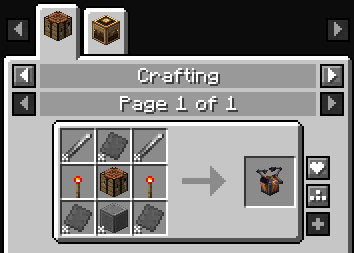
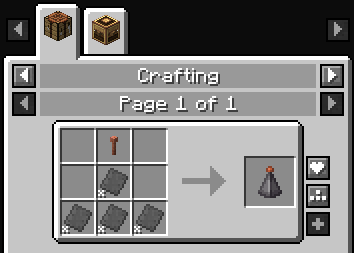
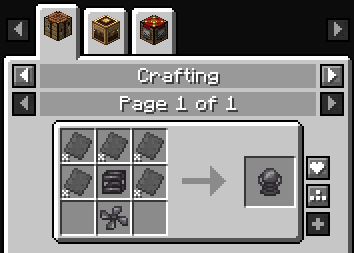
 Rocket Nose Cone
 Steel BlockSteel BlockSteel BlockSteel BlockSteel BlockSteel Block
 Rocket Fin
 Steel TankSteel TankRocket FinRocket Fin
 Steel EngineRocket Fin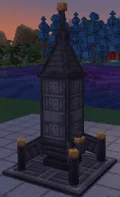
Place a launch pad and put the rocket in its center.
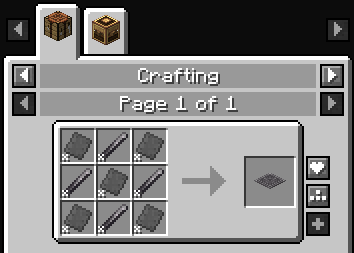
Step 3: Fuel and oxygen
- Collect oil. It spouts from oil wells over the ocean surface. Oil does not renew, and you need at least six buckets for a flight there and back.
- Refine the oil into fuel in a powered fuel refinery.
- Shift + right-click the rocket to open it. Put three buckets of fuel into the input slot and three more into its inventory for the way back.
- Craft a full space suit. Fill it in an oxygen loader, which turns water and power into oxygen.
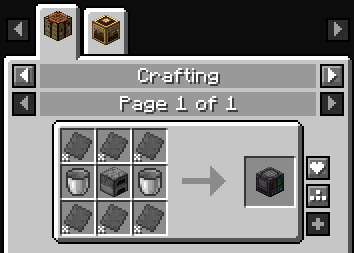
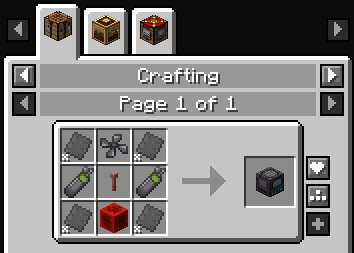
Before you launch, pack a launch pad and three buckets of fuel in the rocket, plus full gas tanks, food, tools and soul torches or glowstone. Normal torches go out on the Moon. Then sit in the rocket and press Space.
| Rocket | Destinations | Material for the next rocket |
|---|---|---|
| Tier 1 | Moon, Earth orbit | Desh |
| Tier 2 | Mars | Ostrum |
| Tier 3 | Venus, Mercury | Calorite |
| Tier 4 | Glacio | None, this is the last tier |
To fly home, Shift + right-click the lander to collect the rocket, fuel and launch pad, set them up again and launch. Glacio is the only destination with breathable air.
Checklist
Watch
Dieses Kapitel folgt dem Handbuch von Ad Astra, dem Astrodux. Ad Astra hat eine eigene Stahlherstellung, aber Stahl aus Mekanism, Immersive Engineering oder Tinkers zählt für die Raketenrezepte ebenfalls. Nur Stahlplatten müssen aus dem Kompressor von Ad Astra oder aus Immersive Engineering kommen.
Schritt 1: Energie, Stahl und Platten
- Baue einen Kohlegenerator. Er verbrennt Kohle oder Holz und versorgt alle Maschinen von Ad Astra.
- Baue einen Etrionischen Hochofen und stelle ihn auf Legieren. Ein Eisenbarren und eine Kohle ergeben einen Stahlbarren.
- Baue einen Kompressor. Er presst Stahlbarren zu Stahlplatten.
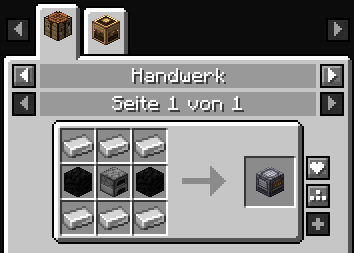
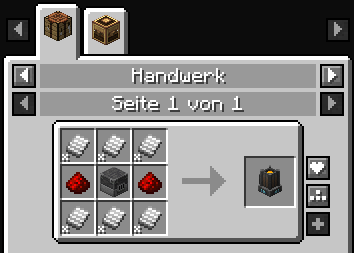
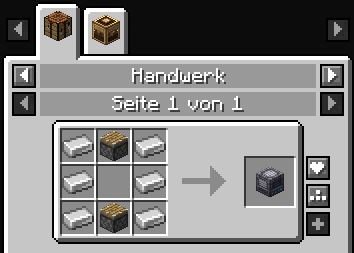
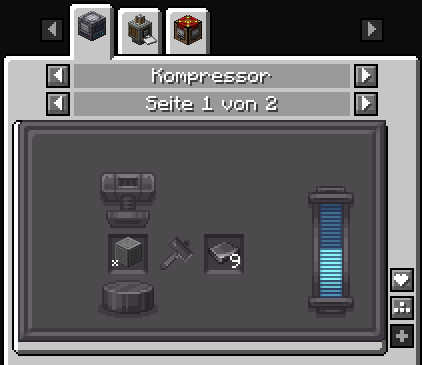
Schritt 2: Die Rakete bauen
Stelle die Teile her: einen Nasenkegel, vier Flossen, zwei Stahltanks und einen Stahlmotor. Setze sie mit sechs Stahlblöcken in der NASA-Werkbank zusammen.
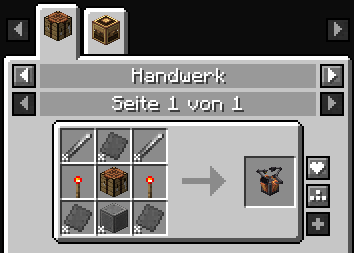
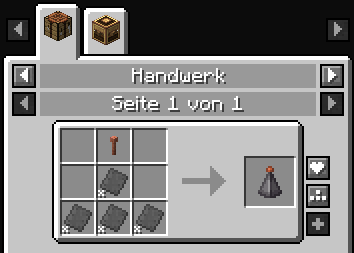
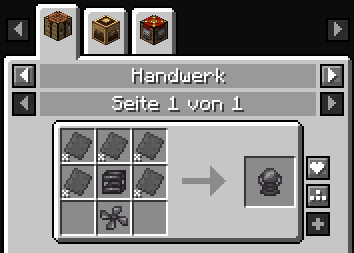 RaketennasenkegelStahlblockStahlblockStahlblockStahlblockStahlblockStahlblockRaketenflosseStahltankStahltankRaketenflosseRaketenflosseStahlmotorRaketenflosse
Setze eine Startrampe und stelle die Rakete in ihre Mitte.
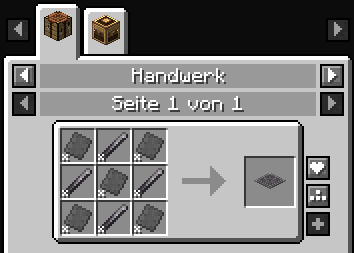
Schritt 3: Treibstoff und Sauerstoff
- Sammle Öl. Es sprudelt aus Ölquellen über der Meeresoberfläche. Öl wächst nicht nach, und für Hin- und Rückflug brauchst du mindestens sechs Eimer.
- Raffiniere das Öl in einer mit Strom versorgten Kraftstoffraffinerie zu Treibstoff.
- Öffne die Rakete mit Shift + Rechtsklick. Leg drei Eimer Treibstoff in den Eingabeslot und drei weitere für den Rückweg in ihr Inventar.
- Stelle einen vollständigen Raumanzug her. Fülle ihn in einem Sauerstofflader, der aus Wasser und Strom Sauerstoff macht.
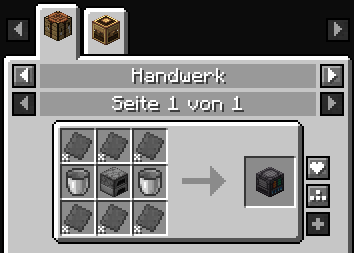
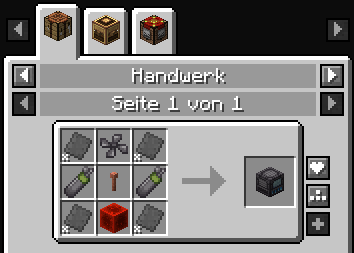
Vor dem Start packst du eine Startrampe und drei Eimer Treibstoff in die Rakete, dazu volle Gasbehälter, Essen, Werkzeug und Seelenfackeln oder Leuchtstein. Normale Fackeln gehen auf dem Mond aus. Dann setz dich in die Rakete und drück Leertaste.
| Rakete | Ziele | Material für die nächste Rakete |
|---|---|---|
| Stufe 1 | Mond, Erdumlaufbahn | Desh |
| Stufe 2 | Mars | Ostrum |
| Stufe 3 | Venus, Merkur | Calorite |
| Stufe 4 | Glacio | Keins, das ist die letzte Stufe |
Für den Heimflug öffnest du die Landekapsel mit Shift + Rechtsklick, nimmst Rakete, Treibstoff und Startrampe heraus, baust alles wieder auf und startest. Glacio ist das einzige Ziel mit atembarer Luft.
Checkliste
Videos
Other worldsAndere Welten
Four dimensions and a world of caves below your feet.Vier Dimensionen und eine Höhlenwelt unter deinen Füßen.
The Twilight Forest
The bosses follow a fixed order: Naga, Twilight Lich, then Minoshroom and Hydra, Knight Phantoms, Ur-Ghast, Alpha Yeti and Snow Queen. Areas you have not unlocked yet hurt you with effects like hunger or blindness, so follow the order.
Alex's Caves
- Find an underground cabin. They generate below most overworld biomes.
- Take the Cave Tablets from its barrel. Put a tablet and paper into the Spelunkery Table and solve the word puzzle to turn it into a Cave Codex. If you fail, the tablet breaks.
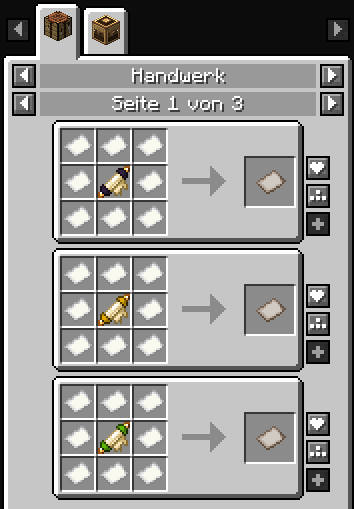
- Surround the codex with eight paper to craft a Cave Biome Map. Use it, and it searches up to 10,000 blocks for that biome.
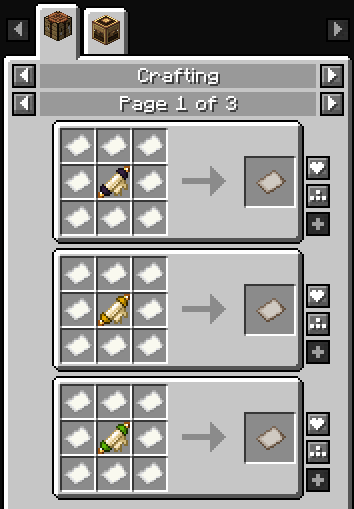
The Otherside and the End
- The Otherside (Deeper and Darker): every Ancient City has a portal frame of reinforced deepslate. Clear the sculk from it, defeat the Warden for its Heart of the Deep and right-click the frame with it. The heart is not used up.
- The End (End Remastered): Eyes of Ender do not work. You need 12 of 16 special eyes from structures and bosses all over the world. The full list is in the mod guides.
Checklist
Watch
Der Twilight Forest
Die Bosse haben eine feste Reihenfolge: Naga, Twilight Lich, dann Minoshroom und Hydra, Knight Phantoms, Ur-Ghast, Alpha Yeti und Snow Queen. Gebiete, die du noch nicht freigeschaltet hast, schaden dir mit Effekten wie Hunger oder Blindheit, also halte dich an die Reihenfolge.
Alex's Caves
- Finde eine Untergrundhütte. Sie liegen unter den meisten Oberwelt-Biomen.
- Nimm die Höhlentafeln aus ihrem Fass. Leg eine Tafel und Papier in den Höhlenforschungstisch und löse das Worträtsel, damit daraus ein Höhlenkodex wird. Scheiterst du, zerbricht die Tafel.
- Umgib den Kodex mit acht Papier, um eine Höhlenbiomkarte herzustellen. Benutze sie, dann sucht sie bis zu 10.000 Blöcke weit nach dem Biom.
Die Otherside und das End
- Die Otherside (Deeper and Darker): Jede Antike Stätte hat einen Portalrahmen aus verstärktem Tiefenschiefer. Entferne das Sculk davon, besiege den Wärter für sein Heart of the Deep und klicke damit den Rahmen an. Das Herz wird nicht verbraucht.
- Das End (End Remastered): Enderaugen funktionieren nicht. Du brauchst 12 von 16 besonderen Augen aus Strukturen und von Bossen in der ganzen Welt. Die ganze Liste steht in den Mod-Guides.
Checkliste
Videos
Magic and better toolsMagie und bessere Werkzeuge
Mana from flowers, and tools made from the materials you choose.Mana aus Blumen und Werkzeuge aus den Materialien, die du wählst.
Botania
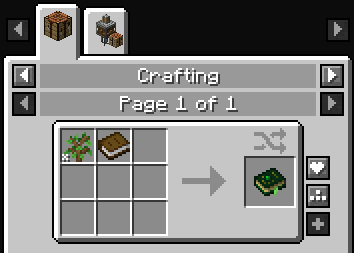
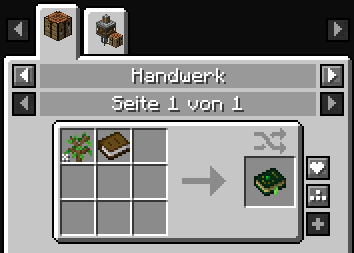
- Craft the Lexica Botania from a book and a sapling. It is the mod's full manual.
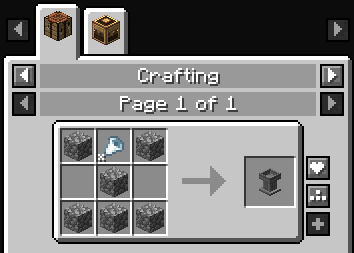
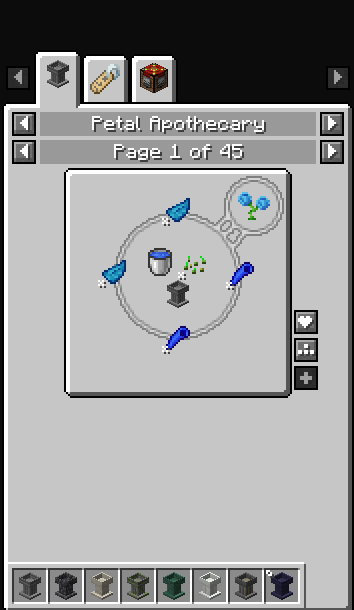
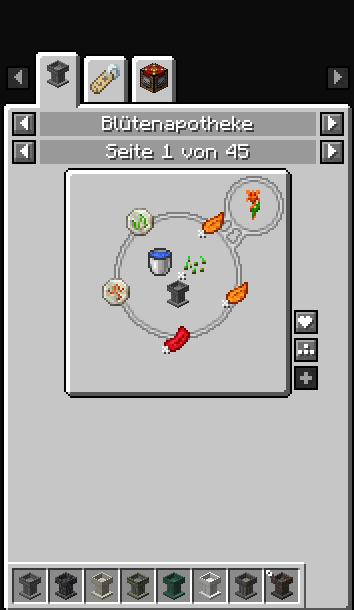
- Collect mystical flowers and build a petal apothecary. Fill it with water, then throw in petals and seeds to grow new flowers. Press U on the apothecary to see all 45 recipes.
- Plant a Pure Daisy to turn stone into livingrock and logs into livingwood.
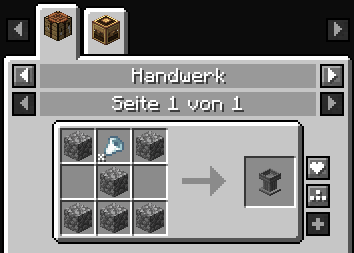
- Make mana with an Endoflame, which burns fuel you drop next to it. A mana spreader sends the mana into a mana pool. Link them with the Wand of the Forest.
Tinkers' Construct
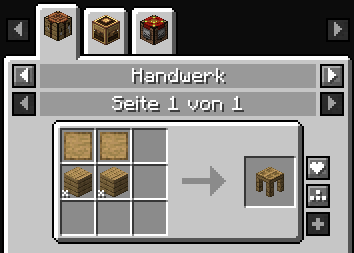
- Build a part builder and a tinker station. Your first tools come from wood, stone and flint.
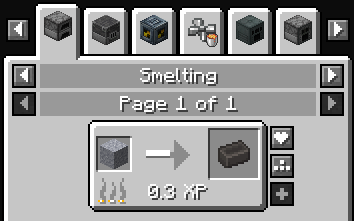
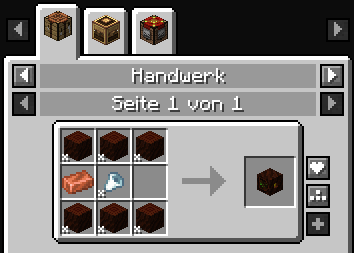
- Mix grout from clay, sand and gravel and smelt it into seared bricks.
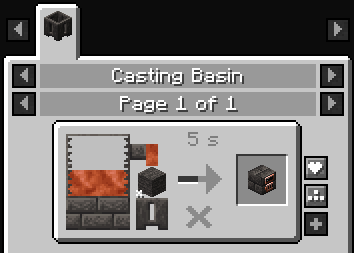
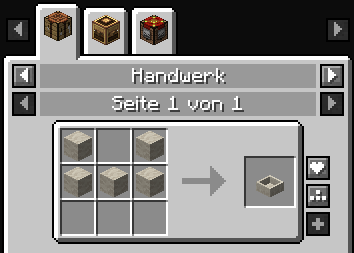
- Cast the smeltery controller in a casting basin, then build the smeltery around it with seared bricks, a fuel tank with lava, a drain and a faucet.
- Melt metals, mix alloys and cast tool parts. Each material gives tools its own traits.
Checklist
Watch
Botania
- Stelle die Lexica Botania aus einem Buch und einem Setzling her. Sie ist das komplette Handbuch der Mod.
- Sammle mystische Blumen und baue eine Blütenapotheke. Fülle sie mit Wasser und wirf Blütenblätter und Samen hinein, um neue Blumen zu züchten. Drück U auf der Apotheke, um alle 45 Rezepte zu sehen.
- Pflanze ein Reines Gänseblümchen, das Stein in Lebestein und Stämme in Lebeholz verwandelt.
- Erzeuge Mana mit einer Endoflamme, die Brennstoff verbrennt, den du daneben wirfst. Ein Manaverbreiter schickt das Mana in ein Manabecken. Verbinde alles mit dem Stab des Waldes.
Tinkers' Construct
- Baue einen Teilebauer und eine Bastelstation. Deine ersten Werkzeuge entstehen aus Holz, Stein und Feuerstein.
- Mische Mörtel aus Ton, Sand und Kies und brenne ihn zu angebrannten Ziegeln.
- Gieße die Schmelzsteuerung in einem Gießbecken, dann baue die Schmelzerei darum herum: angebrannte Ziegel, ein versengter Kraftstofftank mit Lava, ein versengter Abfluss und ein Wasserhahn.
- Schmilz Metalle, mische Legierungen und gieße Werkzeugteile. Jedes Material gibt Werkzeugen eigene Eigenschaften.
Checkliste
Videos
Controls
Horizons Unbound keeps the controls simple. Minecraft's own keys stay as they are, and only the few mod keys the pack really needs are bound. Every other mod key is free, so you can set it up the way you like under Options → Controls. No key does two things, and Space, Shift and Ctrl are only used for jumping, sneaking and sprinting.
Keyboard layout: keys are shown as on a US keyboard. Minecraft always displays the right label for your own keyboard in the controls menu.
Pack keys
| Key | Action |
|---|---|
| J | Map |
| B | Open the backpack you are wearing |
| V | Voice chat menu |
| Caps Lock | Voice chat: talk (hold) |
| Alt + W | Create: hold over an item in a menu for its tutorial |
| G | AE2: hold over an item in a menu for its guide |
| N | Mekanism: switch item mode (configurator, tools) |
| R | Leave an aircraft |
| M | FTB Chunks map: claim and force-load chunks |
Minecraft (unchanged)
| Key | Action |
|---|---|
| W | Walk forward |
| S | Walk backward |
| A | Strafe left |
| D | Strafe right |
| Space | Jump |
| Shift | Sneak |
| Ctrl | Sprint |
| E | Inventory |
| Q | Drop item |
| F | Swap item to offhand |
| T | Chat |
| / | Command |
| Tab | Player list |
| L | Advancements |
| P | Social interactions |
| F2 | Screenshot |
| F5 | Change perspective |
| F11 | Fullscreen |
| C | Save hotbar |
| X | Load hotbar |
| Left click | Attack / break |
| Right click | Use / place |
| Middle click | Pick block |
| 1 … 9 | Hotbar slots |
Recipe viewer (EMI)
EMI has its own keys, which work only in menus and therefore never clash with the keys above. You change them in EMI's settings, not in the controls menu.
| Key | Action |
|---|---|
| R or Left click | Show recipes |
| U or Right click | Show uses |
| A | Add to favorites |
| Backspace | Previous recipe page |
| Ctrl + F | Search |
| Ctrl + O | Show / hide EMI |
Worth binding yourself: Curios slots, Carry On, Tool Belt, Jade details, shader toggle, Mekanism details and jetpack boost, Relics abilities, PneumaticCraft jet boots, Ad Astra suit flight and the AE2 wireless terminal. Find them with the search bar in Options → Controls. If you played an earlier test version of the pack, click Reset Keys there once to get this layout.
Steuerung
Horizons Unbound hält die Steuerung einfach. Die Minecraft-Tasten bleiben, wie sie sind, und nur die wenigen Mod-Tasten, die das Pack wirklich braucht, sind belegt. Alle anderen Mod-Tasten sind frei, damit du sie unter Optionen → Steuerung so einrichten kannst, wie du willst. Keine Taste hat zwei Aufgaben, und Leertaste, Shift und Strg sind nur zum Springen, Schleichen und Sprinten da.
Tastaturlayout: Die Tasten sind so angegeben, wie sie auf einer deutschen Tastatur (QWERTZ) beschriftet sind. Im Steuerungsmenü zeigt Minecraft immer die passende Beschriftung für deine Tastatur.
Pack-Tasten
| Taste | Aktion |
|---|---|
| J | Karte |
| B | Getragenen Rucksack öffnen |
| V | Voice-Chat-Menü |
| Feststelltaste | Voice Chat: sprechen (halten) |
| Alt + W | Create: in Menüs über einem Item halten für die Anleitung |
| G | AE2: in Menüs über einem Item halten für den Guide |
| N | Mekanism: Item-Modus wechseln (Konfigurator, Werkzeuge) |
| R | Flugzeug verlassen |
| M | FTB-Chunks-Karte: Chunks claimen und geladen halten |
Minecraft (unverändert)
| Taste | Aktion |
|---|---|
| W | Vorwärts gehen |
| S | Rückwärts gehen |
| A | Nach links gehen |
| D | Nach rechts gehen |
| Leertaste | Springen |
| Shift | Schleichen |
| Strg | Sprinten |
| E | Inventar |
| Q | Item fallen lassen |
| F | Item in die zweite Hand |
| T | Chat |
| - | Befehl |
| Tab | Spielerliste |
| L | Fortschritte |
| P | Soziale Interaktionen |
| F2 | Screenshot |
| F5 | Perspektive wechseln |
| F11 | Vollbild |
| C | Schnellleiste speichern |
| X | Schnellleiste laden |
| Linksklick | Angreifen / abbauen |
| Rechtsklick | Benutzen / platzieren |
| Mittelklick | Block auswählen |
| 1 … 9 | Schnellleisten-Slots |
Rezeptanzeige (EMI)
EMI hat eigene Tasten, die nur in Menüs wirken und deshalb nie mit den Tasten oben kollidieren. Du änderst sie in den EMI-Einstellungen, nicht im Steuerungsmenü.
| Taste | Aktion |
|---|---|
| R oder Linksklick | Rezepte anzeigen |
| U oder Rechtsklick | Verwendungen anzeigen |
| A | Zu Favoriten hinzufügen |
| Rücktaste | Vorherige Rezeptseite |
| Strg + F | Suche |
| Strg + O | EMI ein/aus |
Lohnt sich selbst zu belegen: Curios-Slots, Carry On, Werkzeuggürtel, Jade-Details, Shader an/aus, Mekanism-Details und Jetpack-Boost, Relics-Fähigkeiten, PneumaticCraft-Jet-Boots, Ad-Astra-Anzugflug und das kabellose AE2-Terminal. Du findest sie über die Suche unter Optionen → Steuerung. Falls du eine frühere Testversion des Packs gespielt hast, klicke dort einmal auf Tasten zurücksetzen, um diese Belegung zu bekommen.
Tech
Step by step: chapters 2 and 3 (Create), 4 (Mekanism) and 5 (AE2) of your journey show every first machine with pictures.
The tech mods share one world and work together. A typical base starts with Create, adds Mekanism for ore processing and ends with an AE2 network that stores and crafts everything automatically.
Create
Create runs on rotational power from water wheels, windmills and later steam engines. Start with Andesite Alloy, then build a mechanical press and mixer, and grow into trains and mechanical crafters. Hold Alt + W over any Create item to watch how it works.
Included add-ons: Crafts & Additions (electricity), Central Kitchen and Slice & Dice (cooking automation), Deco, Bells & Whistles, Hypertube, Rechiseled: Create and Create Repair (bug fixes).
Mekanism ore processing
Mekanism multiplies your ore output. Each tier builds on the one before it:
| Output | Machines |
|---|---|
| 2× ingots | Enrichment Chamber |
| 3× ingots | Purification Chamber (needs oxygen) |
| 4× ingots | Chemical Injection Chamber (needs hydrogen chloride) |
| 5× ingots | Chemical Dissolution Chamber, Chemical Washer and Chemical Crystallizer |
Applied Energistics 2
AE2 stores your items digitally and can craft on demand. Find a meteorite to get certus quartz and the inscriber presses, then build an ME Controller, a drive and storage cells. Applied Mekanistics lets AE2 store Mekanism's gases, and wireless terminals let you reach your network from anywhere.
More tech
- Thermal Series, Immersive Engineering and Industrial Foregoing for machines, power and automation
- Ender IO, PneumaticCraft: Repressurized, Extreme Reactors and Flux Networks
- Draconic Evolution for the endgame
- Hostile Neural Networks to simulate mob drops without a mob farm
Watch
Tech
Schritt für Schritt: Die Kapitel 2 und 3 (Create), 4 (Mekanism) und 5 (AE2) deines Wegs zeigen jede erste Maschine mit Bildern.
Die Tech-Mods teilen sich eine Welt und arbeiten zusammen. Eine typische Basis beginnt mit Create, nimmt Mekanism für die Erzverarbeitung dazu und endet mit einem AE2-Netzwerk, das alles automatisch lagert und herstellt.
Create
Create läuft mit Rotationsenergie aus Wasserrädern, Windmühlen und später Dampfmaschinen. Beginne mit Andesitlegierung, baue dann eine mechanische Presse und einen Mixer und arbeite dich zu Zügen und mechanischen Werkbänken hoch. Halte Alt + W über einem Create-Item gedrückt, um zu sehen, wie es funktioniert.
Enthaltene Add-ons: Crafts & Additions (Elektrizität), Central Kitchen und Slice & Dice (Koch-Automatisierung), Deco, Bells & Whistles, Hypertube, Rechiseled: Create und Create Repair (Fehlerbehebungen).
Erzverarbeitung mit Mekanism
Mekanism vervielfacht deinen Erzertrag. Jede Stufe baut auf der vorherigen auf:
| Ertrag | Maschinen |
|---|---|
| 2× Barren | Enrichment Chamber |
| 3× Barren | Purification Chamber (braucht Sauerstoff) |
| 4× Barren | Chemical Injection Chamber (braucht Chlorwasserstoff) |
| 5× Barren | Chemical Dissolution Chamber, Chemical Washer und Chemical Crystallizer |
Applied Energistics 2
AE2 lagert deine Items digital und kann auf Abruf herstellen. Finde einen Meteoriten, um Certus-Quarz und die Pressen für den Inscriber zu bekommen. Danach baust du einen ME-Controller, ein Laufwerk und Speicherzellen. Applied Mekanistics lässt AE2 auch Gase von Mekanism speichern, und mit kabellosen Terminals erreichst du dein Netzwerk von überall.
Weitere Technik
- Thermal Series, Immersive Engineering und Industrial Foregoing für Maschinen, Energie und Automatisierung
- Ender IO, PneumaticCraft: Repressurized, Extreme Reactors und Flux Networks
- Draconic Evolution für das Endgame
- Hostile Neural Networks, um Mob-Drops ohne Mob-Farm zu simulieren
Videos
Space travel
Step by step: chapter 6, To the Moon walks you through every recipe of the first launch.
With Ad Astra you build rockets in the NASA Workbench, refine oil into rocket fuel and launch from a launch pad. Every new rocket tier needs a metal from the previous destination, so the planets form a natural progression.
| Rocket | Destinations | What you find |
|---|---|---|
| Tier 1 | Moon, Earth orbit | Desh |
| Tier 2 | Mars | Ostrum |
| Tier 3 | Venus, Mercury | Calorite |
| Tier 4 | Glacio (another star system) | Ice shards and a new frozen world |
Before your first launch: wear a full space suit and bring oxygen. Most planets have no breathable air, and some are deadly hot or cold. Build an oxygen distributor to make your base livable.
Raumfahrt
Schritt für Schritt: Kapitel 6, Mit Ad Astra zum Mond führt dich durch jedes Rezept bis zum ersten Start.
Mit Ad Astra baust du Raketen in der NASA Workbench, raffinierst Öl zu Raketentreibstoff und startest von einer Startrampe. Jede neue Raketenstufe braucht ein Metall vom vorherigen Ziel, sodass die Planeten eine natürliche Reihenfolge bilden.
| Rakete | Ziele | Was du findest |
|---|---|---|
| Stufe 1 | Mond, Erdumlaufbahn | Desh |
| Stufe 2 | Mars | Ostrum |
| Stufe 3 | Venus, Merkur | Calorite |
| Stufe 4 | Glacio (ein anderes Sternsystem) | Eissplitter und eine neue, gefrorene Welt |
Vor deinem ersten Start: Trage einen vollständigen Raumanzug und nimm Sauerstoff mit. Auf den meisten Planeten gibt es keine atembare Luft, und manche sind tödlich heiß oder kalt. Baue einen Sauerstoffverteiler, damit deine Basis bewohnbar wird.
Dimensions
Pictures and portal guide: see chapter 7, Other worlds.
| Dimension | How to get there | Mod |
|---|---|---|
| The Nether | Obsidian portal, as usual | Vanilla, overhauled fortresses by YUNG's |
| The Twilight Forest | Dig a 2×2 pool of water, surround it with flowers or grass and throw a diamond in | The Twilight Forest |
| The Otherside | Activate the portal frame in an Ancient City with the Heart of the Deep, dropped by the Warden | Deeper and Darker |
| The End | The End portal needs special eyes, collected from structures and bosses across the world, not Eyes of Ender | End Remastered |
| Moon, Mars, Venus, Mercury, Glacio | By rocket, see Space travel | Ad Astra |
Dimensionen
Bilder und Portal-Anleitung: siehe Kapitel 7, Andere Welten.
| Dimension | So kommst du hin | Mod |
|---|---|---|
| Der Nether | Obsidian-Portal wie gewohnt | Vanilla, Festungen überarbeitet von YUNG's |
| Twilight Forest | Grabe ein 2×2-Wasserbecken, umrande es mit Blumen oder Gras und wirf einen Diamanten hinein | The Twilight Forest |
| The Otherside | Aktiviere den Portalrahmen in einer Antiken Stätte mit dem Heart of the Deep, das der Wärter fallen lässt | Deeper and Darker |
| Das End | Das Endportal braucht besondere Augen, die du in Strukturen und bei Bossen in der ganzen Welt findest, keine Enderaugen | End Remastered |
| Mond, Mars, Venus, Merkur, Glacio | Per Rakete, siehe Raumfahrt | Ad Astra |
Exploration
A new overworld
Terralith, Biomes O' Plenty and Ecologics add about a hundred biomes. Climate Rivers makes rivers wind naturally through the landscape. Use Nature's Compass to find a specific biome.
Alex's Caves
Deep underground you can find whole new cave biomes, such as the Magnetic Caves, Primordial Caves with dinosaurs, Toxic Caves, the Abyssal Chasm and the Forlorn Hollows. Each has its own creatures, blocks and tech. Look up Cave Map in EMI to learn how to locate them.
Structures & loot
YUNG's mods rework dungeons, mineshafts, temples, fortresses and ocean monuments. ChoiceTheorem's Overhauled Village, Repurposed Structures, Dungeon Crawl, Structory and Moog's Voyager Structures add many more. Thanks to Lootr, every player gets their own loot from each chest, so nobody misses out in multiplayer.
Getting around
Activate Waystones to teleport between them, build a plane with Immersive Aircraft or lay down Create train tracks.
Erkundung
Eine neue Oberwelt
Terralith, Biomes O' Plenty und Ecologics fügen rund hundert Biome hinzu. Climate Rivers lässt Flüsse natürlich durch die Landschaft fließen. Mit dem Nature's Compass findest du gezielt ein bestimmtes Biom.
Alex's Caves
Tief unter der Erde warten ganz neue Höhlenbiome, etwa die Magnetic Caves, die Primordial Caves mit Dinosauriern, die Toxic Caves, der Abyssal Chasm und die Forlorn Hollows. Jedes hat eigene Kreaturen, Blöcke und Technik. Suche in EMI nach Cave Map, um zu erfahren, wie du sie findest.
Strukturen & Beute
Die Mods von YUNG überarbeiten Dungeons, Minen, Tempel, Festungen und Ozeanmonumente. ChoiceTheorem's Overhauled Village, Repurposed Structures, Dungeon Crawl, Structory und Moog's Voyager Structures fügen noch viele weitere hinzu. Dank Lootr bekommt jeder Spieler seine eigene Beute aus jeder Truhe, sodass im Multiplayer niemand leer ausgeht.
Unterwegs
Aktiviere Waystones, um dich zwischen ihnen zu teleportieren, baue ein Flugzeug mit Immersive Aircraft oder verlege Create-Schienen.
Magic & combat
Step by step: chapter 8 covers Botania and Tinkers' Construct with recipes and pictures.
- Botania: craft the Lexica Botania (a book plus a sapling) and read it to start. Your first goal is the Pure Daisy and mana generation.
- Tinkers' Construct: build a smeltery and create tools and weapons from many materials. The guide books explain each material's traits.
- Artifacts and Relics: rare accessories with unique abilities, mostly found in structure loot.
- Better Combat: every weapon type has its own attack animation and combo. Two-handed weapons hit several enemies at once.
Magie & Kampf
Schritt für Schritt: Kapitel 8 zeigt Botania und Tinkers' Construct mit Rezepten und Bildern.
- Botania: Stelle das Lexica Botania her (ein Buch plus ein Setzling) und lies es zum Einstieg. Dein erstes Ziel ist die Pure Daisy und die Mana-Erzeugung.
- Tinkers' Construct: Baue eine Schmelzerei und stelle Werkzeuge und Waffen aus vielen Materialien her. Die Handbücher erklären die Eigenschaften jedes Materials.
- Artifacts und Relics: seltene Accessoires mit besonderen Fähigkeiten, meist als Beute in Strukturen.
- Better Combat: Jede Waffenart hat eigene Angriffsanimationen und Kombos. Zweihandwaffen treffen mehrere Gegner gleichzeitig.
Farming & building
Farming & food
Farmer's Delight, Croptopia and Ender's Delight add hundreds of crops and meals. Cooking for Blockheads turns your kitchen into a recipe book. Right-click a ripe crop to harvest and replant it in one go. AppleSkin shows how much hunger and saturation each food restores.
Building & decoration
All Macaw's mods, Handcrafted, Rechiseled, Chisels & Bits, FramedBlocks, Twigs, Quark and Supplementaries give you thousands of blocks. Furnish it with working kitchens and electronics from MrCrayfish's Furniture Mod: Refurbished, hang string lights with Fairy Lights and put your own pictures on the wall with Immersive Paintings. Take photos of your builds with the working camera from Exposure.
Farmen & Bauen
Landwirtschaft & Essen
Farmer's Delight, Croptopia und Ender's Delight bringen Hunderte Pflanzen und Gerichte. Cooking for Blockheads macht deine Küche zum Rezeptbuch. Ein Rechtsklick auf reife Pflanzen erntet und pflanzt sie in einem Schritt neu. AppleSkin zeigt dir, wie viel Hunger und Sättigung jedes Essen wiederherstellt.
Bauen & Dekoration
Alle Mods von Macaw's, Handcrafted, Rechiseled, Chisels & Bits, FramedBlocks, Twigs, Quark und Supplementaries geben dir Tausende Blöcke. Richte alles mit funktionierenden Küchen und Elektronik aus MrCrayfish's Furniture Mod: Refurbished ein, häng Lichterketten mit Fairy Lights auf und bring mit Immersive Paintings eigene Bilder an die Wand. Mit der funktionierenden Kamera aus Exposure kannst du Fotos von deinen Bauten machen.
Mod guides
Short starter guides for the biggest mods in the pack. Each one gets you through the first hours. For the details, every mod has its own guide book or manual in the game.
⚙️ Create
Create builds machines that run on rotational power instead of electricity. Every machine uses a certain amount of stress, and every generator provides stress capacity. Wear Engineer's Goggles to see the numbers.
- Make Andesite Alloy from andesite and iron or zinc nuggets. It is the base of all early Create parts.
- Build a water wheel next to flowing water and carry its power with shafts and cogwheels.
- Add a Mechanical Press to make metal sheets, and an Encased Fan to wash, smoke or smelt items in bulk.
- Put a Mechanical Mixer on a Basin. With a Blaze Burner underneath you can mix brass from copper and zinc.
- Brass unlocks precision mechanisms, trains, logistics with packagers and chain conveyors, and much more.
- Hold Alt + W over any Create item to watch an animated Ponder tutorial.

- Zinc ore generates underground. Crushing ores with Create's crushing wheels gives extra output.
- Bigger wheels and windmills give more stress capacity. If machines stop, check the stress with the goggles.
More: official Create wiki
Step by step with pictures: chapter 2, Your first machines with Create
Watch
🔋 Mekanism
Mekanism is a large tech mod with machines, gases, ore multiplication and a high-end power suit.
- Mine osmium ore and smelt it. Osmium is Mekanism's core metal.
- Build a Metallurgic Infuser and infuse iron with carbon (coal or charcoal) to get steel.
- Make power with a Heat Generator or Solar Generators from Mekanism Generators.
- Start ore processing with an Enrichment Chamber for double output, then upgrade step by step (see the table in the Tech section).
- An Electrolytic Separator splits water into hydrogen and oxygen, which later machines need.
- Use the Configurator to set which side of a machine takes or gives items, gases and energy. N switches its mode.
- Factories process several items at once and save a lot of space.
- The fission reactor is very powerful but dangerous. Read its guide entry before you build one.
Step by step with pictures: chapter 4, Steel and double ore
Watch
💾 Applied Energistics 2
AE2 stores all your items digitally in one network and can craft anything automatically.
- Find a meteorite. They leave large craters. A Meteorite Compass points to the nearest one.
- Mine the Mysterious Cube in the center to get all four inscriber presses. Take the budding certus quartz blocks home too.
- Grow certus quartz on the budding blocks. Growth Accelerators next to them speed this up a lot.
- Build an Inscriber and a Charger, then make logic, calculation and engineering processors.
- Build your first network: Energy Acceptor, ME Drive with storage cells, a Terminal and cables.
- A network runs 8 devices without a controller. From the 9th device on you need an ME Controller and channel planning.
- Autocrafting uses pattern providers, molecular assemblers and crafting CPUs. Advanced AE adds faster versions.
- Hold G over an AE2 item to open its guide page.
More: official AE2 guide
Step by step with pictures: chapter 5, Digital storage with AE2
Watch
🔥 Thermal Series
Thermal adds simple, reliable machines powered by Redstone Flux (RF), plus new metals like tin, lead, silver and nickel.
- Craft a Redstone Furnace and a Pulverizer. The pulverizer turns one ore into two dusts.
- Make power with dynamos. The Stirling Dynamo burns solid fuel, the Magmatic Dynamo burns lava.
- Move energy, fluids and items with Thermal Dynamics ducts.
- Upgrade machines with augments for speed, efficiency or extra output.
- To switch tool modes, bind Cycle Mode Up/Down under Options → Controls.
Watch
🏭 Immersive Engineering
Immersive Engineering is about large multiblock machines and real-looking power lines.
- Craft the Engineer's Manual (a book and a lever). It shows every recipe and multiblock layer by layer.
- Craft the Engineer's Hammer. Right-click the center block of a finished structure to form a multiblock.
- Build a Coke Oven to turn coal into coal coke. It also produces creosote oil.
- Build a Blast Furnace to make steel from iron and coal coke. Steel unlocks most machines.
- Generate power with a water wheel or windmill on a kinetic dynamo and connect machines with wires.
- Multiblocks form in the direction you are facing. If one does not form, compare it with the manual's 3D preview.
- The Crusher, Arc Furnace and Excavator are great mid-game goals.
Watch
💨 PneumaticCraft: Repressurized
PneumaticCraft runs on compressed air, measured in bar. Too much pressure makes machines explode.
- Get your first compressed iron by dropping iron ingots next to TNT and blowing it up. Some ingots are lost, so start small.
- Craft an Air Compressor, which burns fuel to make pressure, and connect machines with pressure tubes.
- Build a Pressure Chamber multiblock. From now on you make compressed iron and other materials with pressure instead of TNT.
- Etch printed circuit boards to unlock advanced machines, drones and pneumatic armor.
- Early machines handle about 5 bar. Add safety valves early.
- Oil from the overworld can be refined into fuels for stronger compressors.
Watch
🐉 Draconic Evolution
Draconic Evolution is the endgame of the pack, with huge energy storage and the strongest gear.
- Find draconium ore. It is most common in the End. Each Ender Dragon kill also drops plenty of draconium dust.
- Craft basic tools and the Wyvern tier from draconium.
- Kill the Ender Dragon for a Dragon Heart. With fusion crafting it turns draconium into Awakened Draconium for the Draconic tier.
- Defeat the Chaos Guardian far out in the End for chaos shards and the Chaotic tier.
- The Energy Core stores enormous amounts of power.
- The Draconic Reactor can destroy your base if it is run badly. Build it far away and read its manual first.
Watch
🚀 Ad Astra
Ad Astra takes you to space. Every planet unlocks the next rocket.
- Make steel and build a NASA Workbench to assemble rockets.
- Refine crude oil into rocket fuel in a Fuel Refinery and fill the rocket.
- Craft a space suit and fill your oxygen with an Oxygen Loader.
- Fly to the Moon with the Tier 1 rocket. Desh from the Moon unlocks Tier 2 for Mars, Ostrum from Mars unlocks Tier 3 for Venus and Mercury, and Calorite from Venus unlocks Tier 4 for Glacio.
- An Oxygen Distributor fills a sealed room with air, so you can build bases on any planet.
- Venus and Mercury are extremely hot. Take a heat-resistant suit before you land there.
- Space stations can be built in orbit.
Step by step with pictures: chapter 6, To the Moon
Watch
🪨 Alex's Caves
Alex's Caves adds six rare underground biomes: the Magnetic Caves, Primordial Caves, Toxic Caves, Abyssal Chasm, Forlorn Hollows and Candy Cavity.
- Find an underground cabin. They generate in most overworld biomes.
- Take the Cave Tablets from its barrel and use the Spelunkery Table with a tablet and paper. Guess the hidden word to turn the tablet into a Cave Codex. Failing destroys the tablet.
- Combine the codex with paper to make a Cave Biome Map, then use it. It searches up to 10,000 blocks for that biome.
- Pack food, a bed and good gear. The biomes can be thousands of blocks away.
- The Toxic Caves are radioactive. Bring protection before you explore them.
- The Abyssal Chasm is deep under the ocean, so you need a way to breathe underwater.
- Some items have a special ability. Bind Alex's Caves Special Ability under Options → Controls to use it.
More: Alex's Caves wiki
Step by step with pictures: chapter 7, Other worlds
Watch
🌲 The Twilight Forest
The Twilight Forest is a dimension with a fixed boss order. Areas you have not unlocked yet punish you with effects like hunger or blindness.
- Make a portal: a 2×2 pool of water surrounded by flowers or grass, then throw a diamond in.
- Defeat the bosses in order: Naga → Twilight Lich → Minoshroom → Hydra → Knight Phantoms → Ur-Ghast → Alpha Yeti → Snow Queen.
- After that, the Highlands open up with the troll caves and the Final Castle.
- Each boss drops a trophy and gear for the next step.
- Magic Maps and Maze Maps help you find structures.
Step by step with pictures: chapter 7, Other worlds
Watch
👁️ End Remastered
Eyes of Ender do not open the End portal in this pack. You need 12 of the 16 special eyes. They also lead you to the stronghold like normal eyes.
| Eye | Where to get it |
|---|---|
| Old Eye | Desert pyramid |
| Nether Eye | Nether fortress |
| Cold Eye | Igloo |
| Rogue Eye | Jungle pyramid |
| Black Eye | Buried treasure |
| Magical Eye | Dropped by evokers |
| Lost Eye | Mineshaft |
| Corrupted Eye | Pillager outpost |
| Wither Eye | Dropped by the Wither |
| Guardian Eye | Dropped by elder guardians |
| Witch Eye | Crafted with a witch pupil from witches |
| Cursed Eye | Bastion treasure |
| Exotic Eye | Crafted from ocean items |
| Evil Eye | Traded from master clerics |
| Undead Eye | Crafted with an undead soul from skeleton horses |
| Cryptic Eye | Rare reward from enchanting |
More: End Remastered project page
Watch
🌸 Botania
Botania is nature magic powered by mana from flowers.
- Craft the Lexica Botania from a book and a sapling. It explains everything.
- Collect the 16 kinds of mystical flowers and turn their petals into new flowers in a Petal Apothecary.
- Plant a Pure Daisy. It turns stone into livingrock and wood into livingwood.
- Build a Mana Pool and a Mana Spreader, and generate mana with an Endoflame, which burns fuel you drop next to it.
- Link flowers, spreaders and pools with the Wand of the Forest.
- Throwing diamonds or ender pearls into a full pool makes mana diamonds and pearls, the key to the Runic Altar.
- Long-term goals: Terrasteel and the portal to Alfheim.
Step by step with pictures: chapter 8, Magic and better tools
Watch
🔨 Tinkers' Construct
Tinkers' Construct lets you build tools and weapons from parts, and every material adds its own traits.
- Craft the guide book Materials and You (a book plus a pattern or grout).
- Build a Part Builder and a Tinker Station and make your first tools from wood, stone and flint.
- Mix grout from clay, sand and gravel and smelt it into seared bricks.
- Build a small melter first, then the Smeltery, to melt metals, mix alloys and cast tool parts.
- Add modifiers with materials like redstone (speed) or quartz (damage) at the Tinker Station.
- Broad tools like the hammer or cleaver need a Tinker's Anvil.
Step by step with pictures: chapter 8, Magic and better tools
Watch
🍲 Farmer's Delight & Serene Seasons
Cooking and farming are their own progression in this pack.
- Check the season. Most crops only grow in certain seasons. Hover over seeds to see which ones.
- Craft a Cutting Board and knives to process food.
- Put a Cooking Pot on a heat source like a campfire or stove and cook full meals.
- Plant on rich soil for faster growth.
- Crops under greenhouse glass ignore the seasons, so you can grow them all year.
- Bigger meals give better effects such as comfort and nourishment.
Watch
Mod-Guides
Kurze Einstiegs-Guides für die größten Mods im Pack. Sie bringen dich durch die ersten Stunden. Für alle Details hat jede Mod ihr eigenes Handbuch im Spiel.
⚙️ Create
Create baut Maschinen, die mit Rotationsenergie statt mit Strom laufen. Jede Maschine verbraucht eine bestimmte Belastung (Stress), und jeder Generator liefert Belastungskapazität. Mit der Ingenieursbrille siehst du die Werte.
- Stelle Andesitlegierung aus Andesit und Eisen- oder Zinknuggets her. Sie ist die Grundlage aller frühen Create-Teile.
- Baue ein Wasserrad an fließendes Wasser und leite die Energie mit Wellen und Zahnrädern weiter.
- Mit einer mechanischen Presse stellst du Metallplatten her. Ein ummantelter Lüfter wäscht, räuchert oder schmilzt Items in großen Mengen.
- Setze einen mechanischen Mixer auf ein Becken. Mit einem Lohenbrenner darunter mischst du Messing aus Kupfer und Zink.
- Messing schaltet Präzisionsmechanismen, Züge, Logistik mit Packern und Kettenförderern und vieles mehr frei.
- Halte Alt + W über einem Create-Item, um eine animierte Ponder-Anleitung zu sehen.
- Zinkerz kommt unter der Erde vor. Erze in Create-Brechwalzen zu zerkleinern bringt zusätzlichen Ertrag.
- Größere Räder und Windmühlen liefern mehr Kapazität. Bleiben Maschinen stehen, prüfe die Belastung mit der Brille.
Mehr: offizielles Create-Wiki (Englisch)
Schritt für Schritt mit Bildern: Kapitel 2, Deine ersten Maschinen mit Create
Videos
🔋 Mekanism
Mekanism ist eine große Tech-Mod mit Maschinen, Gasen, Erzvervielfachung und einem High-End-Anzug.
- Baue Osmiumerz ab und schmelze es. Osmium ist das Grundmetall von Mekanism.
- Baue einen Metallurgic Infuser und reichere Eisen mit Kohlenstoff (Kohle oder Holzkohle) zu Stahl an.
- Erzeuge Strom mit einem Heat Generator oder Solar Generators aus Mekanism Generators.
- Beginne die Erzverarbeitung mit einer Enrichment Chamber für doppelten Ertrag und rüste dann Stufe für Stufe auf (siehe Tabelle im Tech-Abschnitt).
- Ein Electrolytic Separator spaltet Wasser in Wasserstoff und Sauerstoff, die spätere Maschinen brauchen.
- Mit dem Configurator legst du fest, welche Seite einer Maschine Items, Gase und Energie aufnimmt oder abgibt. N wechselt seinen Modus.
- Factories verarbeiten mehrere Items gleichzeitig und sparen viel Platz.
- Der Spaltreaktor ist sehr stark, aber gefährlich. Lies vor dem Bau seinen Guide-Eintrag.
Schritt für Schritt mit Bildern: Kapitel 4, Stahl und doppeltes Erz
Videos
💾 Applied Energistics 2
AE2 lagert alle deine Items digital in einem Netzwerk und kann alles automatisch herstellen.
- Finde einen Meteoriten. Er hinterlässt einen großen Krater. Ein Meteoritenkompass zeigt auf den nächsten.
- Baue den Mysterious Cube in der Mitte ab, um alle vier Inscriber-Pressen zu bekommen. Nimm auch die knospenden Certus-Quarz-Blöcke mit.
- Lass Certus-Quarz auf den knospenden Blöcken wachsen. Growth Accelerators daneben beschleunigen das stark.
- Baue einen Inscriber und einen Charger und stelle Logik-, Rechen- und Konstruktionsprozessoren her.
- Baue dein erstes Netzwerk: Energy Acceptor, ME Drive mit Speicherzellen, ein Terminal und Kabel.
- Ein Netzwerk betreibt ohne Controller 8 Geräte. Ab dem 9. brauchst du einen ME Controller und musst Kanäle planen.
- Autocrafting nutzt Pattern Provider, Molecular Assembler und Crafting-CPUs. Advanced AE bringt schnellere Versionen.
- Halte G über einem AE2-Item, um seine Guide-Seite zu öffnen.
Mehr: offizieller AE2-Guide (Englisch)
Schritt für Schritt mit Bildern: Kapitel 5, Digitales Lager mit AE2
Videos
🔥 Thermal Series
Thermal bringt einfache, zuverlässige Maschinen, die mit Redstone Flux (RF) laufen, und neue Metalle wie Zinn, Blei, Silber und Nickel.
- Baue einen Redstone Furnace und einen Pulverizer. Der Pulverizer macht aus einem Erz zwei Staub.
- Erzeuge Strom mit Dynamos. Der Stirling Dynamo verbrennt feste Brennstoffe, der Magmatic Dynamo Lava.
- Transportiere Energie, Flüssigkeiten und Items mit den Leitungen von Thermal Dynamics.
- Rüste Maschinen mit Augments für mehr Tempo, Effizienz oder Ertrag auf.
- Um Werkzeugmodi zu wechseln, belege Cycle Mode Up/Down unter Optionen → Steuerung.
Videos
🏭 Immersive Engineering
Bei Immersive Engineering dreht sich alles um große Multiblock-Maschinen und realistisch aussehende Stromleitungen.
- Stelle das Engineer's Manual her (ein Buch und ein Hebel). Es zeigt jedes Rezept und jeden Multiblock Schicht für Schicht.
- Stelle den Engineer's Hammer her. Ein Rechtsklick auf den mittleren Block eines fertigen Aufbaus formt den Multiblock.
- Baue einen Koksofen, der Kohle zu Koks macht. Nebenbei entsteht Kreosotöl.
- Baue einen Hochofen, der aus Eisen und Koks Stahl macht. Stahl schaltet die meisten Maschinen frei.
- Erzeuge Strom mit einem Wasserrad oder einer Windmühle an einem Kinetic Dynamo und verbinde Maschinen mit Kabeln.
- Multiblocks richten sich nach deiner Blickrichtung. Klappt einer nicht, vergleiche ihn mit der 3D-Vorschau im Handbuch.
- Crusher, Arc Furnace und Excavator sind gute Ziele für das Mid-Game.
Videos
💨 PneumaticCraft: Repressurized
PneumaticCraft läuft mit Druckluft, gemessen in bar. Zu viel Druck lässt Maschinen explodieren.
- Dein erstes Presseisen bekommst du, indem du Eisenbarren neben TNT wirfst und es zündest. Ein Teil der Barren geht verloren, also fang klein an.
- Baue einen Air Compressor, der mit Brennstoff Druck erzeugt, und verbinde Maschinen mit Druckleitungen.
- Baue eine Pressure Chamber als Multiblock. Ab jetzt stellst du Presseisen und andere Materialien mit Druck statt TNT her.
- Ätze Leiterplatten, um fortgeschrittene Maschinen, Drohnen und die pneumatische Rüstung freizuschalten.
- Frühe Maschinen vertragen etwa 5 bar. Baue früh Sicherheitsventile ein.
- Öl aus der Oberwelt lässt sich zu Treibstoffen für stärkere Kompressoren raffinieren.
Videos
🐉 Draconic Evolution
Draconic Evolution ist das Endgame des Packs, mit riesigen Energiespeichern und der stärksten Ausrüstung.
- Finde Draconiumerz. Am häufigsten ist es im End. Jeder Sieg über den Enderdrachen bringt außerdem viel Draconiumstaub.
- Stelle einfache Werkzeuge und die Wyvern-Stufe aus Draconium her.
- Besiege den Enderdrachen für ein Drachenherz. Mit Fusion Crafting macht es aus Draconium Awakened Draconium für die Draconic-Stufe.
- Besiege den Chaos Guardian weit draußen im End für Chaos-Splitter und die Chaotic-Stufe.
- Der Energy Core speichert gewaltige Mengen Energie.
- Der Draconic Reactor kann bei falscher Bedienung deine Basis zerstören. Baue ihn weit weg und lies vorher sein Handbuch.
Videos
🚀 Ad Astra
Ad Astra bringt dich ins All. Jeder Planet schaltet die nächste Rakete frei.
- Stelle Stahl her und baue eine NASA Workbench, um Raketen zusammenzubauen.
- Raffiniere Rohöl in einer Fuel Refinery zu Raketentreibstoff und betanke die Rakete.
- Stelle einen Raumanzug her und fülle deinen Sauerstoff mit einem Oxygen Loader auf.
- Fliege mit der Stufe-1-Rakete zum Mond. Desh vom Mond schaltet Stufe 2 für den Mars frei, Ostrum vom Mars Stufe 3 für Venus und Merkur, und Calorite von der Venus Stufe 4 für Glacio.
- Ein Oxygen Distributor füllt einen abgedichteten Raum mit Luft, so kannst du auf jedem Planeten Basen bauen.
- Venus und Merkur sind extrem heiß. Nimm einen hitzebeständigen Anzug mit, bevor du dort landest.
- Im Orbit kannst du Raumstationen bauen.
Schritt für Schritt mit Bildern: Kapitel 6, Mit Ad Astra zum Mond
Videos
🪨 Alex's Caves
Alex's Caves fügt sechs seltene Untergrund-Biome hinzu: die Magnetic Caves, Primordial Caves, Toxic Caves, den Abyssal Chasm, die Forlorn Hollows und die Candy Cavity.
- Finde eine Untergrund-Hütte. Sie kommt in den meisten Oberwelt-Biomen vor.
- Nimm die Cave Tablets aus ihrem Fass und lege eine Tafel mit Papier in den Spelunkery Table. Errate das versteckte Wort, um die Tafel in einen Cave Codex zu verwandeln. Scheiterst du, geht die Tafel kaputt.
- Kombiniere den Codex mit Papier zu einer Cave Biome Map und benutze sie. Sie sucht bis zu 10.000 Blöcke weit nach dem Biom.
- Pack Essen, ein Bett und gute Ausrüstung ein. Die Biome können Tausende Blöcke entfernt sein.
- Die Toxic Caves sind radioaktiv. Nimm Schutz mit, bevor du sie erkundest.
- Der Abyssal Chasm liegt tief unter dem Meer, du brauchst also eine Möglichkeit, unter Wasser zu atmen.
- Manche Items haben eine Spezialfähigkeit. Belege dafür Alex's Caves Special Ability unter Optionen → Steuerung.
Mehr: Alex's-Caves-Wiki (Englisch)
Schritt für Schritt mit Bildern: Kapitel 7, Andere Welten
Videos
🌲 The Twilight Forest
Der Twilight Forest ist eine Dimension mit fester Boss-Reihenfolge. Gebiete, die du noch nicht freigeschaltet hast, bestrafen dich mit Effekten wie Hunger oder Blindheit.
- Baue ein Portal: ein 2×2-Wasserbecken, umrandet von Blumen oder Gras, dann wirf einen Diamanten hinein.
- Besiege die Bosse in dieser Reihenfolge: Naga → Twilight Lich → Minoshroom → Hydra → Knight Phantoms → Ur-Ghast → Alpha Yeti → Snow Queen.
- Danach öffnen sich die Highlands mit den Troll-Höhlen und dem Final Castle.
- Jeder Boss lässt eine Trophäe und Ausrüstung für den nächsten Schritt fallen.
- Magic Maps und Maze Maps helfen dir, Strukturen zu finden.
Schritt für Schritt mit Bildern: Kapitel 7, Andere Welten
Videos
👁️ End Remastered
Enderaugen öffnen das Endportal in diesem Pack nicht. Du brauchst 12 der 16 besonderen Augen. Wie normale Augen führen sie dich zur Festung.
| Auge | Fundort |
|---|---|
| Old Eye | Wüstentempel |
| Nether Eye | Netherfestung |
| Cold Eye | Iglu |
| Rogue Eye | Dschungeltempel |
| Black Eye | Vergrabener Schatz |
| Magical Eye | Lassen Magier fallen |
| Lost Eye | Mine |
| Corrupted Eye | Plünderer-Außenposten |
| Wither Eye | Lässt der Wither fallen |
| Guardian Eye | Lassen Großwächter fallen |
| Witch Eye | Hergestellt mit einer Hexenpupille von Hexen |
| Cursed Eye | Bastionsschatz |
| Exotic Eye | Hergestellt aus Meeres-Items |
| Evil Eye | Handel mit Meister-Geistlichen |
| Undead Eye | Hergestellt mit einer Untoten-Seele von Skelettpferden |
| Cryptic Eye | Seltene Belohnung beim Verzaubern |
Mehr: Projektseite von End Remastered (Englisch)
Videos
🌸 Botania
Botania ist Naturmagie, angetrieben von Mana aus Blumen.
- Stelle das Lexica Botania aus einem Buch und einem Setzling her. Es erklärt alles.
- Sammle die 16 Arten mystischer Blumen und mache aus ihren Blütenblättern in einer Petal Apothecary neue Blumen.
- Pflanze eine Pure Daisy. Sie verwandelt Stein in Livingrock und Holz in Livingwood.
- Baue einen Mana Pool und einen Mana Spreader und erzeuge Mana mit einer Endoflame, die Brennstoff verbrennt, den du daneben fallen lässt.
- Verbinde Blumen, Spreader und Pools mit dem Wand of the Forest.
- Wirfst du Diamanten oder Enderperlen in einen vollen Pool, entstehen Mana-Diamanten und -Perlen, der Schlüssel zum Runic Altar.
- Langfristige Ziele: Terrasteel und das Portal nach Alfheim.
Schritt für Schritt mit Bildern: Kapitel 8, Magie und bessere Werkzeuge
Videos
🔨 Tinkers' Construct
Mit Tinkers' Construct baust du Werkzeuge und Waffen aus Einzelteilen, und jedes Material bringt eigene Eigenschaften mit.
- Stelle das Handbuch Materials and You her (ein Buch plus ein Muster oder Grout).
- Baue einen Part Builder und eine Tinker Station und stelle erste Werkzeuge aus Holz, Stein und Feuerstein her.
- Mische Grout aus Ton, Sand und Kies und brenne ihn zu Seared Bricks.
- Baue zuerst einen kleinen Melter, dann die Smeltery, um Metalle zu schmelzen, Legierungen zu mischen und Werkzeugteile zu gießen.
- An der Tinker Station fügst du Modifikatoren hinzu, etwa Redstone (Tempo) oder Quarz (Schaden).
- Große Werkzeuge wie Hammer oder Hackbeil brauchen einen Tinker's Anvil.
Schritt für Schritt mit Bildern: Kapitel 8, Magie und bessere Werkzeuge
Videos
🍲 Farmer's Delight & Serene Seasons
Kochen und Landwirtschaft sind in diesem Pack ein eigener Fortschrittsweg.
- Achte auf die Jahreszeit. Die meisten Pflanzen wachsen nur zu bestimmten Jahreszeiten. Fahre mit der Maus über Samen, um zu sehen, zu welchen.
- Stelle ein Schneidebrett und Messer her, um Essen zu verarbeiten.
- Stelle einen Kochtopf auf eine Hitzequelle wie ein Lagerfeuer oder einen Herd und koche ganze Mahlzeiten.
- Pflanze auf reichhaltiger Erde, damit alles schneller wächst.
- Pflanzen unter Gewächshausglas ignorieren die Jahreszeiten, so kannst du das ganze Jahr ernten.
- Größere Mahlzeiten geben bessere Effekte wie Behaglichkeit und Sättigung.
Videos
Performance
The pack ships with Embeddium, ModernFix, FerriteCore, ImmediatelyFast, Entity Culling and Dynamic FPS, and the configs are tuned. On your very first launch, Default Options sets render distance 10, simulation distance 8, VSync off and automatic GUI scale. Updates never overwrite your settings later.
If the game runs slowly
- Lower the render distance first. It makes the biggest difference by far. Values of 8 to 12 look good with this pack.
- Allocate 8 GB of RAM. More than 10 GB tends to cause longer stutters.
- Turn off shaders, or use a lighter shader profile.
- Close browsers and other programs while you play.
Performance
Das Pack enthält Embeddium, ModernFix, FerriteCore, ImmediatelyFast, Entity Culling und Dynamic FPS, und die Configs sind abgestimmt. Beim allerersten Start setzt Default Options die Sichtweite auf 10, die Simulationsdistanz auf 8, schaltet VSync aus und wählt die GUI-Skalierung automatisch. Spätere Updates überschreiben deine Einstellungen nie.
Wenn das Spiel langsam läuft
- Senke zuerst die Sichtweite. Das bringt mit Abstand am meisten. Werte von 8 bis 12 sehen mit diesem Pack gut aus.
- Weise 8 GB RAM zu. Mehr als 10 GB führt eher zu längeren Rucklern.
- Schalte Shader aus oder nutze ein leichteres Shader-Profil.
- Schließe Browser und andere Programme, während du spielst.
Shaders
Shaders work through Oculus, and Colorwheel makes them work with Create's moving contraptions. No shader pack is included.
- Download an Iris-compatible shader pack, for example Complementary Reimagined or BSL.
- Put the zip file into the shaderpacks folder of your instance. Do not unzip it.
- In the game, open Options → Video Settings → Shader Packs and select it.
Shader
Shader funktionieren über Oculus, und Colorwheel sorgt dafür, dass sie auch mit beweglichen Create-Konstruktionen laufen. Ein Shaderpack ist nicht enthalten.
- Lade ein Iris-kompatibles Shaderpack herunter, zum Beispiel Complementary Reimagined oder BSL.
- Lege die Zip-Datei in den Ordner shaderpacks deiner Instanz. Nicht entpacken.
- Öffne im Spiel Optionen → Grafikeinstellungen → Shader Packs und wähle es aus.
Help & FAQ
The game crashed. What should I do?
Crash Assistant opens automatically after a crash. Click Upload all and include the link it copies when you report the issue. That link contains everything needed to find the cause.
Is there a server pack?
Yes. Download the server pack from the Files tab on CurseForge. There is a ready-to-run version for Windows and Linux and a version for Pterodactyl panels. Both include a README with setup steps.
Can I add or remove mods?
Yes, it's your game. Please test with an unmodified install before you report a bug, though, so we know the problem comes from the pack.
Why is there no Eye of Ender recipe for the End portal?
End Remastered replaces the portal with special eyes. You find them by exploring structures and defeating bosses all over the world. Turning the End into a real journey is the point of the mod.
My crops don't grow.
Serene Seasons is active, and most crops only grow in certain seasons. Hover over the seed to see its fertile seasons, or plant inside a greenhouse.
Can I play with friends?
Yes. Open your world to LAN or host a server with the server pack. Lootr gives every player their own chest loot, and Simple Voice Chat adds proximity voice chat. Hold Caps Lock to talk and press V for its settings. On a server, press M and claim your chunks with FTB Chunks. Other players can then not break or open anything there.
Hilfe & FAQ
Das Spiel ist abgestürzt. Was nun?
Crash Assistant öffnet sich nach einem Absturz automatisch. Klicke auf Upload all und füge den kopierten Link deiner Fehlermeldung bei. Der Link enthält alles, was zur Ursachensuche nötig ist.
Gibt es ein Server-Pack?
Ja. Lade das Server-Pack im Reiter Files auf CurseForge herunter. Es gibt eine startfertige Version für Windows und Linux und eine Version für Pterodactyl-Panels. Beide enthalten eine README mit der Einrichtung.
Darf ich Mods hinzufügen oder entfernen?
Klar, es ist dein Spiel. Bitte teste vor einer Fehlermeldung aber mit einer unveränderten Installation, damit klar ist, dass das Problem vom Pack kommt.
Warum funktionieren Enderaugen nicht für das Endportal?
End Remastered ersetzt das Portal durch besondere Augen. Du findest sie, indem du Strukturen erkundest und Bosse in der ganzen Welt besiegst. Genau das ist die Idee der Mod: Der Weg ins End wird zu einer echten Reise.
Meine Pflanzen wachsen nicht.
Serene Seasons ist aktiv, und die meisten Pflanzen wachsen nur in bestimmten Jahreszeiten. Fahre mit der Maus über den Samen, um die fruchtbaren Jahreszeiten zu sehen, oder pflanze in einem Gewächshaus.
Kann ich mit Freunden spielen?
Ja. Öffne deine Welt im LAN oder betreibe einen Server mit dem Server-Pack. Lootr gibt jedem Spieler eigene Truhenbeute, und Simple Voice Chat bringt Sprachchat nach Entfernung. Halte die Feststelltaste zum Sprechen und drücke V für die Einstellungen. Auf einem Server drückst du M und claimst deine Chunks mit FTB Chunks. Andere Spieler können dort dann nichts abbauen oder öffnen.
Mod listMod-Liste
All mods in Horizons Unbound 1.0.3. Every mod belongs to its authors. Click a name to visit its page and support the people who made it.
Missing a mod? Suggest it for the pack.
Fehlt eine Mod? Schlag sie fürs Pack vor.
Alle Mods in Horizons Unbound 1.0.3. Jede Mod gehört ihren Autoren. Klicke auf einen Namen, um ihre Seite zu besuchen und die Menschen dahinter zu unterstützen.
No mod matches that search.Keine Mod passt zu dieser Suche.